Whenever you create a new credit goods received batch, or load an existing one, Micronet displays the Credit Goods Received Header screen where you enter the main details of the returns batch.
Refer to "Creating a New Credit Goods Received Batch".
Refer to "Recalling a Credit Goods Received Batch".
Micronet displays the Credit Goods Received Header screen.
For more information, refer to "Credit Goods Received Header - Load Receipt".
|
|

|
Best Practice Loading a previous receipt from your purchase history ensures that all the costs for the return are accurate. |
Micronet redisplays the Credit Goods Received Header screen.
|
|
Field |
Value |
|
|
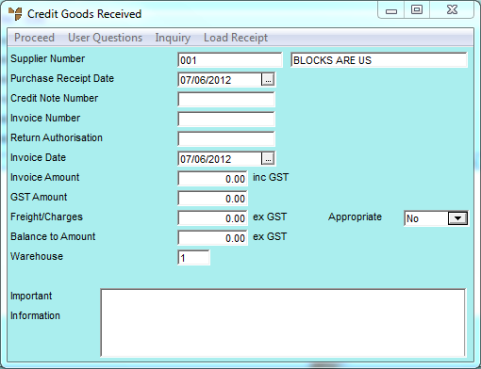
Supplier Number |
Micronet displays the ID and description of the selected supplier. |
|
|
Receipt Type |
2.8 Feature Select the type of items being returned:
If you select Sundry Order, you will only be able to add non-inventory items to the credit goods received batch. |
|
|
Purchase Receipt Date |
Micronet displays today's date. You can change this if required. Enter or select the date the goods were delivered. |
|
|
Credit Note Number |
If you have the supplier's credit note, enter the credit note number. This allows you to post the returns batch as costed, and the information you enter on this screen will update the transaction files in the Micronet Creditors Ledger. If you don't have the supplier's credit note, leave this field blank. You will need to post the returns batch as uncosted. |
|
|
Invoice Number |
If the supplier invoice was received with the goods, enter the supplier's invoice number. When you enter an invoice number, the credit amount is applied to that invoice in the Creditors Ledger, and reduces the outstanding balance to pay the supplier. If the supplier invoice was not received with the goods, leave this field blank. |
|
|
Return Authorisation |
If you don't have a credit note from the supplier but you have been given a return authorisation number, enter it here. Micronet prints this on the return authorisation to accompany the goods being returned to the supplier. |
|
|
Invoice Date |
Enter the date on the supplier's invoice for the goods. |
|
|
Invoice Amount |
Enter the total invoice amount including GST from the supplier's invoice. If you loaded a goods receipt, Micronet displays the invoice amount. |
|
|
GST Amount |
Micronet calculates and displays the GST amount. You should check that this is correct and change it if required. |
|
|
Freight/Charges |
Enter the amount of any freight or extra charges that were included in the original receipt (from the supplier's invoice). |
|
|
Appropriate |
Select Yes if you want Micronet to deduct the freight/charges amount you entered, or select No for the freight/charges to remain. |
|
|
Balance to Amount |
Optionally, enter the amount you want Micronet to balance to. This allows you to account for freight and shipping charges in addition to the cost of the item. |
|
|
Warehouse |
Enter the warehouse ID to show Micronet where the items are being taken from. You can also press Tab or Enter to select a warehouse. |
|
|
Important Information |
Micronet displays any added text in the Supplier master file that is assigned to display as important information on goods received. |
If you are processing a costed return (with supplier's credit note), Micronet displays the Dissect Receipt screen. Refer to "Dissecting a Credit Goods Receipt" for information on using that screen.
If you are processing an uncosted return (without supplier's credit note), Micronet redisplays the Credit Goods Received screen.